HoxWi Platform - User Guide
HoxWi Basics
Who can benefit from our platform?
- Freelancers, students and designers can use our tools to create professional-like websites and small apps
- Developers and advanced designers can use advanced features to integrate professional apps and websites hosted outside the platform
- IoT and Data Scientsts can take advance of our edge version to connect far devices with the cloud and then analyze the data
Understand some basic concepts before starting
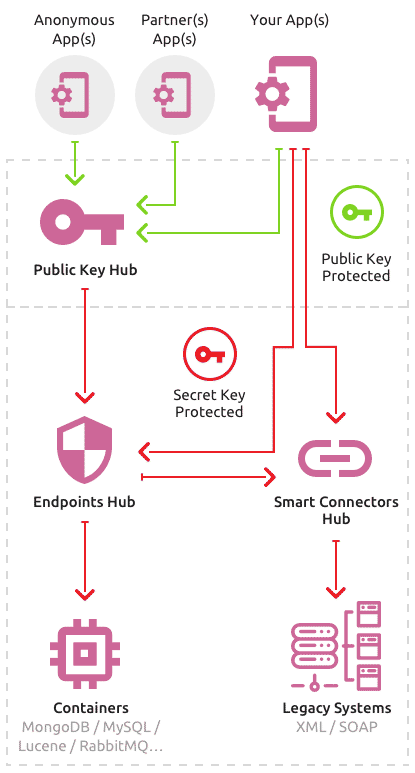
App (Application)
An App represents an external system that may access one or more of your stored data or maybe just an internal web app represented by a landing or static page or a dynamic page, examples being a mobile application or an ERP from a partner for external systems and your own web applications or mobile applications provided and hosted by HoxWi.
Container
Containers are similar to Tables for SQL Databases or Collections for NoSQL databases, it exists to store all your data in a very organized way.
Public Key
Public Keys are useful on JavaScript applications, where you don't want to disclose your secret key or to distribute between partners (one for each), as they allow you to control who is accessing what; they also allow you to restrict partners’ access to their own data as simple as checking a flag.
Endpoint
Endpoints behave as operations providing access to one container. By default, any container has at least the common operations: insert, update, delete, getbyId and search, automatically created.
Smart Connectors
Smart connectors act like a bridge between your App and a third party old fashioned web service. This very useful feature helps you connectwith legacy (XML/SOAP) web services making them available as a ready to use restful micro-service before you start consuming it.
Feature
Features can be anything from a list of cities to a specific country, or a ready to use integration with PayPal or Stripe. Features can be developed by users like you, by selected partners or by our internal team.
Our marketplace, allowing you to download features to your HoxWi account will be made available soon.
How to create your account
The first step is to create your account, you can choose from multiple options and use it for 14 days free of charge.
To create your account go to http://www.hoxwi.com.
HoxWi for Designers
Use our Online tools
Once you create your account you have access to a range of very simple tools to use like the WiPlay that enables you to build web apps with basic html and javascript knowledge.
You can have immediate access to the data collected on your apps using the API Explorer and also the Backoffice area.
How to Create a powerful Landing Page
HoxWi pages is a very simple tool, created by geeks to help you to create "simple" landing pages or single page applications.
Follow these steps to create your own page in just a few minutes (Using the CLI):
- Create your own free HoxWi account by clicking here.
- Download our CLI tool - available here.
-
After activating your HoxWi account and installing the CLI, type the following command to gain access to it:
C:\> CD C:\Program Files (x86)\Wi C:\Program Files (x86)\Wi> Wi -u [your email] -p [your password] Eg. C:\Program Files (x86)\Wi>Wi -u [email protected] -p 12345 -
Once logged in, have a look at the features available that you can clone:
Wi> show features -
On this sample we want to create a new public single page so, we are going to select the "siglepage" feature as "to clone":
Please note that the new page name can't have spaces.Wi> clone feature singlepage -as YOUR-NEW-PAGE-NAME Eg. clone feature singlepage -as mynewpageFollow the instructions providing a nice and short title and description of your page. If you want to collect data on this first page, please also provide a container name; if not just leave it blank.
-
By now you probably have a local html file in your machine named YOUR-NEW-PAGE-NAME.html, the path to this file will be given to you from the CLI. You can edit it using your favorite text or html editor and then publish it back using the following command:
Wi> push app YOUR-NEW-PAGE-NAMEPlease note that you shouldn't use the ".html" when pushing it back, just the page name is enough.
-
All sorted. Your new page is now on-line at: https://YOUR-ALIAS.hoxwi.com/Pages/YOUR-NEW-PAGE-NAME
If you don't know your account alias, please check the API Explorer. It can find the alias on the first tab under your account secret key.
Customers of professional plans can have either custom domains or custom aliases. This can be enabled later on.
How to Create a full APP
HoxWi app's is a sophisticatedtool allowing developers to create robust applications in a non-usual way.
In order to use HoxWi app's you just need to have one IDEA of what you want to build and some basic HTML/JavaScript skills.
User: guest &
Password: guest
Follow these steps to create your own app in just a few minutes:
- Create your own free HoxWi account by clicking here.
- Download our CLI tool - available here.
-
After activating your HoxWi account and installing the CLI, type the following command to gain access to it:
C:\> CD C:\Program Files (x86)\Wi C:\Program Files (x86)\Wi> Wi -u youremail -p your password -
Once logged in, have a look at the features available that you can clone:
Wi> show features -
On this sample we want to create a complete new app so, we are going to select a package as "to clone":
Wi> clone feature sampleapp-pkgFollow the instructions providing a nice and short title and description of each page contained into the selected package. New pages can be added later on.
-
By now you probably have three local html files in your machine, the file paths and names are available at the botton of your cli screen. You can edit it using your favorite text or html editor and then publish it back using the following command:
Wi> push app UPDATED-PAGE-NAMEPlease note that you shouldn't use the ".html" when pushing it back, just the page name is enough.
- The customers ranking section uses an advanced resource called "AGGREGATION", pelase have a look into this article to understand how it works on HoxWi.
-
All sorted. Your new app is now on-line at: https://YOUR-ALIAS.hoxwi.com/App/applayout/Login
If you don't know your account alias, please check the API Explorer. It can find the alias on the first tab under your account secret key.
Customers of paid plans can have either custom domains or custom aliases. This can be enabled later on.
How to send SMS messages from your apps
The first step is to create your account with Twilio, if you don't have one already.
Once you have your Twilio account please go to the API Explorer and find the tab settings, Twilio. Inform your account SID, Auth Token and Phone number you got from Twilio and you are ready to go.
With HoxWi it is very easy to send SMS messages to your customers using Twilio. You just need to use the JavaScript function SendSMS from any place inside any of your apps.
This is the basic usage of this function:
SendSMS('+353xxxx','your message')Your messages would be automatically logged into the container hxsms, check it out in the Experiment's Lab
This is the code for a simple page that will allow you to test your Twilio configurations
<form class="form-horizontal" role="form" id="NewFrm">
<div layout="row" layout-xs="column">
<div flex>
<md-input-container class="md-icon-float md-block">
<label>To</label>
<input type="text" name="to" ng-model="SelItem.to" aria-label="to"/>
</md-input-container>
</div>
</div>
<div layout="row" layout-xs="column">
<div flex>
<md-input-container class="md-icon-float md-block">
<label>Text (optional)</label>
<input type="text" class="form-control" name="body" ng-model="SelItem.body" />
</md-input-container>
</div>
</div>
<div layout-gt-sm="column" flex>
<md-input-container class="md-icon-float md-block" flex-gt-sm>
<md-button class="md-raised md-primary btn-default btn-animated"
ng-click="SendSms(SelItem.to,SelItem.body);" ng-disabled="!(SelItem.to && SelItem.body)">
<md-tooltip>
Send
</md-tooltip>
Send
<i class="fa fa-check"></i>
</md-button>
</md-input-container>
</div>
</form>To use this code please go to your Wi Play area and create a new app based into the "Private Apple Sample - Home" template.
How to send email messages from your apps
The first step is to create your account with Mailgun, if you don't have one already.
Once you have your Mailgun account please go to the API Explorer and find the tab settings, Mailgun. Inform your domain, domain key and sender email address you registered on Mailgun and you are ready to go.
With HoxWi it is very easy to send email messages to your customers using Mailgun. You just need to use the JavaScript function SendEmail from any place inside any of your apps.
This is the basic usage of this function:
SendEmail('[email protected]','message subject','message content')Your messages would be automatically logged into the container hxemails, check it out in the Experiment's Lab
This is the code for a simple page that will allow you to test your Mailgun configurations
<ol class="breadcrumb">
<li class="breadcrumb-item">
<a href="#">Home</a>
</li>
<li class="breadcrumb-item active">Emails</li>
</ol>
<div class="card mb-3">
<div class="card-header">
<i class="fa fa-chart-line"></i>
Send emails using Mailgun
</div>
<div class="card-body">
<div class="row">
<div class="col-xl-3 col-sm-6 mb-2 col-xs-12">
<div class="card">
<div class="card-body">
<div layout="row" layout-xs="column">
<div flex>
<md-input-container class="md-icon-float md-block">
<label>To</label>
<input type="text" name="to" ng-model="SelItem.to" aria-label="to"/>
</md-input-container>
</div>
</div>
<div layout="row" layout-xs="column">
<div flex>
<md-input-container class="md-icon-float md-block">
<label>Subject</label>
<input type="text" name="subject" ng-model="SelItem.subject" aria-label="subject"/>
</md-input-container>
</div>
</div>
<div layout="row" layout-xs="column">
<div flex>
<md-input-container class="md-icon-float md-block">
<label>Text</label>
<input type="text" class="form-control" name="body" ng-model="SelItem.body" />
</md-input-container>
</div>
</div>
</div>
<div class="card-footer text-white clearfix small z-1">
<md-input-container class="md-icon-float md-block" flex-gt-sm>
<md-button class="md-raised md-primary btn-default btn-animated"
ng-click="SendEmail(SelItem.to,SelItem.subject,SelItem.body);"
ng-disabled="!(SelItem.to && SelItem.subject && SelItem.body)">
<md-tooltip>
Send
</md-tooltip>
Send
<i class="fa fa-check"></i>
</md-button>
</md-input-container>
</div>
</div>
</div>
</div>
</div>
</div>To use this code please go to your Wi Play area and create a new app based into the "Private Apple Sample - Home" template.
HoxWi for Developers
CLI (command line interface)
A CLI (command line interface) is a user interface to HoxWi platform in which the user responds to a visual prompt by typing in a command on a specified line, receives a response back from the system, and then enters another command, and so forth.
HoxWi command line interface or just Wi CLI is a fundamental bridge between administrators and the cloud platform in order to manage API's, databases and applications.
The CLI can be used from multiple operational systems including: Linux, Windows and Mac and some Arm32 and Arm64 IOT devices. Download and install the right version to your machine from one of the links provided below:
HoxWi Command Line Interface for Windows
Please click here to download the installer for Windows machines.
After downloading the file please follow the instructions to install it on your machine.
In order to have the CLI available everywhere into your windows machine you may need to add it to the Windows Path, following this instructions: On the Windows desktop, right-click My Computer.
- In the pop-up menu, click Properties.
- In the System Properties window, click the Advanced tab, and then click Environment Variables.
- In the System Variables window, highlight Path, and click Edit.
- In the Edit System Variables window, insert the cursor at the end of the Variable value field.
- If the last character is not a semicolon (;), add one.
- After the final semicolon, type the full path to the CLI.
In this case c:\Program Files (x86)\Wi
- Click OK in each open window.
- The new path will be used the next time a command prompt is opened, or a service is started.
HoxWi Command Line Interface for Linux
Please click here to download the gz file.
After downloading the file please extract it to /home/Wi and execute the following commands:
- cd /home/Wi
- chmod +x Wi
- ./Wi
HoxWi Command Line Interface for 32 bit arm devices like Raspberry Pi 2/3/3B/4
Please click here to download the gz file.
After downloading the file please extract it to /home/Wi and execute the following commands:
- cd /home/Wi
- chmod +x Wi
- ./Wi
HoxWi Command Line Interface for Arm64 devices like Nvidia Jetson Nano, Tx1, Tx2, Xavier ...
Please click here to download the gz file.
After downloading the file please extract it to /home/Wi and execute the following commands:
- cd /home/Wi
- chmod +x Wi
- ./Wi
The CLI could be used as a stand alone program for any kind of operation concerning the platform or as an additional batch tool used to perform timed / punctual tasks.
CLI Help Content
------- HoxWi Command Line Interface (CLI) -------- > New into version 1.0.0.6 > Local API (For IoT applications) This will bring HoxWi down to the Edge providing your pages and app's locally.Wi> enable apiWi> enable api 10.10.10.10 5050Wi> enable api 10.10.10.10Wi> dir upload [directory to watch] [delete files after upload [y/n]] [max number of files to be kept locally]Wi> dir backup [origin folder] [destination folder] [save logs into your HoxWi account [y/n]]Wi> show apps [category name]Wi> clone app YOUR-APP-TAG -as NEW-TAG-NAME
- OR -
Wi> clone feature FEATURE-TAG -as NEW-TAG-NAME
Wi> push app NEW-TAG-NAME [-version 1.1]Wi> pull app YOUR-APP-TAGWi> push app YOUR-APP-TAG [-version 1.1]Wi> delete app [app tag]Wi> hist app [app tag]Wi> revert app [app tag] -v [exact version number eg. 1.1]Wi> deploy app YOUR-APP-TAGWi> ? | helpWi> use [[sandbox or tst] or [production or prd]]Wi> CONTAINER_NAME.Add("name":"test","value":199, ...)Wi> CONTAINER_NAME.Update("_id":"28439f98dfu8w9ef7982yue_STR","name":"test","value":1000, ...)Wi> get CONTAINER-NAME -id XYZWi> set CONTAINER-NAME -id XYZWi> update CONTAINER-NAME -set FIELD -to VALUE -id XYZWi> update CONTAINER-NAME -set FIELD -to VALUE [-filter("name":"XYZ")]Wi> CONTAINER_NAME.Delete("_id":"28439f98dfu8w9ef7982yue_STR")Wi> CONTAINER_NAME.Delete("value":1000, "name":"test", ...)Wi> CONTAINER_NAME.GetById("_id":"28439f98dfu8w9ef7982yue_STR")Wi> get CONTAINER_NAME -id XYZWi> set CONTAINER_NAME -id XYZWi> CONTAINER_NAME.Search("value":1000, "name":"test", ...)Wi> CONTAINER_NAME.Search({"value":1000, "name":"test"}) -f c:\files\myfilename.csvWi> show containers [mongodb | mysql | lucene]Wi> new container CONTAINERNAMEWi> new pk public-key-descriptionWi> delete pk public-keyWi> new endpoint endpoint-nameWi> delete endpoint endpoint-nameWi> pull endpoint endpoint-name -f c:\your-local-dir\my-endpoint-name.jsonWi> update endpoint endpoint-name -f c:\your-local-dir\my-endpoint-name.jsonWi> show logsWi> show logs 2018
- OR -
Wi> show logs 2018-01
- OR -
Wi> show logs 2018-01-01Wi>show users [profile name]Wi>new User User-name User-login User-passwordWi>update User User-name User-login User-passwordWi>delete User User-loginWi>show profilesWi>new Profile Profile-nameWi>grant profile-name ADULM to (app-tag1, app-tag2 ...)Wi>grant profile-x AXXLM to (XYZAPP)Wi>deny profile-x to (app-tag1, app-tag2 ...)HoxWi for Advanced Developers
You are free to use your own tools
It was made to be used by experts looking only for a backend platform to handle their requests from advanced frontend and mobile apps
How to create your account
Do it using a REST client; you can perform a single call as demonstrated below:
PUT: https://www.hoxwi.com/Wi/NewAccount
Type: application/json
Request(body):
{ "name":"Your Name", "email": "Your Email", "company": " -- optional -- "}Response:
{ "success": true, "message": "The activation email was sent to the informed email address." }Then check your email - you should have received the activation link.
How to configure your connection
Connecting to your account is very straight forward; you just need to know your server address and make http calls as explained below.
Your service URL is like: https://YOUR-AIRPORT-CODE.hoxwi.com and you can find it by loging to your account in hoxwi.com.
Note: every call must specify your secret key as described below (exceptions apply to calls made directly to a Public Key where you do not have to use the secret key).
Important: The server hoxwi.com may refuse your http calls as each customer must connect to their own specific server.
How to use the Platform (with your own app)
Find below basic sample call examples to allow you to insert, update, delete, getbyid or search registers in HoxWi.
Insert a new register
Create a GET/PUT/POST call to https://YOUR-AIRPORT-CODE.hoxwi.com/Dynamic/Add setting the type to application/json.
    {
    "secretkey": "YOUR-SECRET-KEY",
    "container": "CONTAINER-NAME",
    "document": {
    "simple-attribute":"value",
    "complex-attribute": {"sub-attribute":"value"}
    ...
    }
    }
Update an existing register
Create a GET/PUT/POST call to https://YOUR-AIRPORT-CODE.hoxwi.com/Dynamic/Update setting the type to application/json.
{
    "secretkey": "YOUR-SECRET-KEY",
    "container": "CONTAINER-NAME",
    "document": {

    	   -- IMPORTANT: You must inform the HID or _ID when updating

    	  "hid":"key-value" (if storage type = MySQL or Lucene)

    	  -- OR --

    	  "_id":"key-value" (if storage type = MongoDB)

    	  "simple-attribute":"value",
          "complex-attribute": {"sub-attribute":"value"}
	  ...
    }
}Attention: even using MySQL, when updating a document, the system will delete the existing record and include the new one.
Delete an existing register
Create a DELETE call to https://YOUR-AIRPORT-CODE.hoxwi.com/Dynamic/Delete setting the type to application/json.
{
    "secretkey": "YOUR-SECRET-KEY",
    "container": "CONTAINER-NAME",
    "document": {

    	  "hid":"key-value" (if storage type = MySQL or Lucene)

    	  -- OR --

    	  "_id":"key-value" (if storage type = MongoDB)

    	  -- OR --

    	  "simple-attribute":"value" (for any storage when you wish to delete multiple records matching the criteria)
    }
}
Get an existing register by ID
Create a GET/PUT/POST call to https://YOUR-AIRPORT-CODE.hoxwi.com/Dynamic/GetById setting the type to application/json.
{
    "secretkey": "YOUR-SECRET-KEY",
    "container": "CONTAINER-NAME",
    "document": {
    	  "hid":"key-value"
    }
}
Search for existing registers
Create a GET/PUT/POST call to https://YOUR-AIRPORT-CODE.hoxwi.com/Dynamic/Search setting the type to application/json.
{
    "secretkey": "YOUR-SECRET-KEY",
    "container": "CONTAINER-NAME",
    "document": {

--- FOR MySQL and Lucene

         -- Equal operation:
    	  "simple-attribute":"value"

         -- RANGE operation:
    	  "salary" : ">1000",
    	  "salary" : "<12000", -- Not equal operation:
                               "simple-attribute" : "!= some words"
                               -- IN operation:
                               "simple-attribute" : "in ('some', 'words')"
                               -- LIKE operation:
                               "simple-attribute" : "like some words"
                               --- OR FOR MongoDB
                               -- Equal operation:
                               "simple-attribute" :"value"
                               -- OR operation:
                               $or: [ { "simple-attribute" : "test1" }, { "simple-attribute " : "test2" } ]
                               -- RANGE operation:
                               "salary" : { $gt: 1000, $lt:12000 }
                               -- LIKE operation:
                               "simple-attribute" : {$regex : ".*some words.*" }
                               -- NOT LIKE operation
                               "simple-attribute" :{$not: {$regex : ".*some words.*" }}
                               },
                               "orderby" :"attribute name",
                               "limit" :"0-100000",
                               }
How to use the Platform (from external or JavaScript apps)
We strongly recommend that external applications and/or JavaScript based apps use custom protected endpoints through public keys as briefly explained below.
External application sample
For this sample we want to allow the partner X, using the App Y to upload new candidates.
The candidates container already exists, so all we need to do is create a new app called App Y a new publick key called pk-ecarreiras-x-PartnerX and a new endpoint called Insert-new-candidate.
For the external application to insert a new register in your container, it needs to perform the following call.
Create a PUT/POST call to https://YOUR-AIRPORT-CODE.hoxwi.com/Wi/pk-ecarreiras-x-PartnerX/Insert-new-candidate setting the type to application/json.
{
    "document": {
    	  "name":"value",
          "resume": "value"
	  ...
    }
}
JavaScript application sample
JavaScript applications follow a different pattern obtaining a JWT token to be able to authenticate for every call made to the platform.
Please take a look at this article to understand how to achieve it.
Take a look at our samples at www.github.com/HoxWi
Authentication
HoxWi team took care of all the complexity behind creating, managing and consuming users to your applications.
This article intends to show how simple it is to create new users and authenticate them.
Add a new user
To Create a new user you just need to make a PUT call to the endpoint:
https://hoxwi.com/Wi/NewUser
With the following raw body:
{
    "secretkey": "YOUR-API-SECRET-KEY",
    "document": {
        "user":"username",
          "pwd":"password",
                -- optional from here where you can include whatever
                information you want receive back into the JWT Token  --
          "role":"admin"
    }
}
This will give you a JWT token, like the sample below.
{
    "success": true,
    "token": "A-JWT-TOKEN",
    "error": null
}
Authentication
To authenticate using the new user, you simply need to make a PUT call to the endpoint:
https://jfk.hoxwi.com/wi/YOUR-PULIC-KEY/Login
With the following raw body:
{
        "user":"username",
          "pwd":"password",
}
If the username and login are correct you will receive a JWT token, like the sample below.
{
    "success": true,
    "token": "A-JWT-TOKEN",
    "error": null
}
If not, you will see a generic error notification, like the sample below.
{
    "success": false,
    "token": null,
    "error": "Invalid account. Please review your secret key."
}
AngularJS Sample
This is a sample of Authentication Service written in AngularJS 2+
import { Injectable } from '@angular/core';
import { Http, Headers, Response } from '@angular/http';
import { Observable } from 'rxjs/Observable';
import 'rxjs/add/operator/map'

import { AppConfig } from '../app.config';

@Injectable()
export class AuthenticationService {
    constructor(private http: Http, private config: AppConfig) { }

    login(username: string, password: string) {
        return this.http.post(this.config.apiUrl + '/wi/YOUR-PULIC-KEY/Login', { user: username, pwd: password })
            .map((response: Response) => {
                // login successful if there's a jwt token in the response
                let user = response.json();
                if (user && user.token) {
                    // store user details and jwt token in local storage to keep user logged in between page refreshes
                    localStorage.setItem('currentUser', JSON.stringify(user));
                }
            });
    }

    logout() {
        // remove user from local storage to log user out
        localStorage.removeItem('currentUser');
    }
}
The complete sample can be found on our GitHub at github.com/HoxWi/Auth-Angular2.
Nuget packages are available at nuget.org/packages/HoxWi.Client (.NET Standard) or nuget.org/packages/HoxWi.Client.Net4.5 (.NET Framework).